
I have been very happy with my printer except for one thing my printer uses a melzi board. The only issue is there is only one firmware for melzi. This makes testing firmwares in AtCore more difficult since I can’t test on a real machine. In order to do that I need to move to a RAMPS kit. This will allow me to flash just about any firmware that I want. I will keep the details to a minimum for this post would be really long otherwise.

After ordering the nessasary parts all the extra stuff I needed to complete this project I can finally begin. The first step is to build the ramps kit and then install some firmware with a sane configuration. For the first firmware I have decided to go with Repetier 0.92 since its the same as my old firmware.Using repetiers web configuration tool I ran thru all the steps only changing the required items. I was able to download and build this firmware and flash it in no time. The first test of the firmware and the screen didnt show anything. Checking the config I can see that I picked the wrong screen. With that fixed I could discover my next problem the control knob moved backward from what I was used to, it was to fast and had to high a repeat rate . So after a few more configs attempts I was able to get everything worked out and my board was now loaded with firmware.

Time to take the old control box apart and wire up the new one.. There is only one problem the plugs dont all fit on the new. Every wire needs new connectors. I made all my crimps, wireed the new board and fired up the machine. But there were problems. Y moved in the wrong direction and the Z motors were spinnng wrong. It didn’t take long before I had these issues fixed. With the motors all checked and working I was ready to try the heaters. That was when the fun really started, almost instantly you could see smoke and the mosfet for the bed was burning up. This killed that ramps board so i had to order another.
After a few days of waiting I receved my new ramps board and an external mosfet for the heated bed. With those installed every thing was ready to be put into the old case. I had to made a ramps holder that didn’t push the reset button . I did this by printing a few ramps holders and chopping them up and glueing them back together in way that worked in my case.
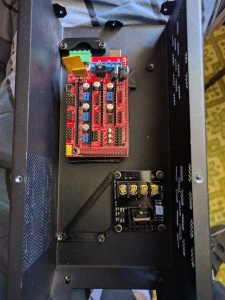
After that hack job was assembled I still needed to mount the mosfet board. Luckly I was able to find another mount and modify it to mount on the two unused melzi mouning posts.I also needed a way to get some space inside the case and a place to put my usb B external plug so we can plugin the ramps nicely from outside the case. I modified a 120mm fan adaptor to include space for my usb port and put the whole thing together to test. Its been working fine for about two weeks now and its printed about half of its new homes parts.
