Atcore / Atelier Dec ’18 Progress

Since I find myself with a bit of down time. I have decided to update you all on the progress of atcore and atelier. We should hopefully be ready soon to start the process of releasing AtCore 2.0. I only have a few things I really want to get merged before I start that process. In the mean time here is what has been landed to AtCore since my last post.

  •  Allow for Reconnect without reset on unix hosts. (rizzitello, D13576)
  •  AtCore will now process Errors from the serialLayer (rizzitello, D15080)
  • Cleaned up Warnings from strict check. (rizzitello, D15861, D15701, D15280)
  • Allow for fractional movement. (i.e move X 6.84mm) (rizzitello, D15224)
  • New Axis Controller (rizzitello, D15281)
  • Use bit percentage for fan speed when needed. (rizzitello, D15700)
  • Use C++ Scoped enums (Cjlcarvalho, D16180)
  • Typo Fixes (yurchor, NO DIFF)
  • Header Typo fix (kbroulik, D17059)
  • Encapsulate the SerialLayer completely (rizzitello, D17146, D16200, D16199)
  • Fix Crash on reconnect on some cases. (rizzitello, D16616)
  •  Clazy Clang-tidy cleaning (rizzitello, D17101)

Atelier is getting more and more polish. Here is what has been landed to atelier since my last post.

  • Allow for Transforming Bed based on profile ( ervin, D16129 / rizzitello, D16144)
  • Check a file exists before attempting to print (laysrodrigues, D15122)
  • Remove Unaccelerated tooltips from lateral area (rizzitello, D16853)
  • Update new feeds as they are received (rizzitello,D16597)
  • QUrl.toString Not always valid (tcanabrava, D16002)
  • Clean up warnings (rizzitello, D16205)
  • Adjust icon size in lateral area for better scaling on a range of hidpi screens(rizzitello, D16855)
  • Prevent Error dialog if user cancels file selector (rizzitello, D17117)
  • Improve UI for mainwindow::askToSave(rizzitello, D17142, D17116)

 

AtCore update 2/18

Changed Merged:

  • Rename Test Gui to atcore-gui
  • More build switches for gui/documents and test
  • Cleaner disconnects from printers
  • Cleaner deployment of devel files
  • Added an extruder control to the axis control
  • Better checks for CONNECTING state.
  • More Readable and easier to expand GCodeCommands.

Things being worked on.

A few users have asked for Sd card support and hopefully the basic version of that will be merged soon. This feature appears to be a more firmware dependent so it may take some time before each of our target firmwares has full support for SD Cards. The other feature that is being worked on is command injection. I have been thinking about adding this for a long time and I finally have a decent set of changes to support this feature in atcore. I can hear some of you out there asking about what exactly I mean by command injection is so I’ll explain. This feature will allow you to place specific commands for atcore into the gcode file. There is no need to worry about the commands breaking your gcode file since they are added in a way that makes them invisible to other hosts. You can trigger temperature changes, speed changes, pauses and more in this way. Using a few injected codes I was able to modify my test code that I print into a print that was made of abs with a tpu core. I didn’t have to touch atcore’s gui other then to resume after the auto initiated pause(s) and I can make prints with multiple colors and materials.

Atcore 0.90.2 Binaries

Release binaries below

Linux (x86_64, AppImage) – rt.click and “Save as”  Make it executable.
SHA256[ae9dde58f38853230be36acb5f2ef6975e4fa90a6ade1e2bef92351f2f01c567]
SHA1[9856db9dc7d1e62669acb4233932cf181d37e034]
MD5[805064ea4951c9b3268d238862b56aef]

Windows(Win7+, portable folder) SHA256[ae025199c1055cedfaf7dfaefe5e1862fb07ca218d66d59b0ec9da152332d596]
SHA1[0bee4054bbec97be2c01891d73ab4b99dbf4f326]
MD5[d610b14c479a7c0136f651c45edc9922]

Mac OSX(osX 10.8+)  SHA256[33c95205be977da0ffa60f7022cf7a965f7c1922b1fbe04e53add641462d5c56]
SHA1[478fdb5e719fbaec8f7c9ce8300cd1075c71d1bf]
MD5[32049e0ff6a02f2f45d29ad890454598]

AtCore’s First public beta!

The time has finally come to release our first beta of AtCore for the general public to use. We would really like to ensure that AtCore is working with as many machines as possible so we encourage everyone who can to test AtCore and provide us with feedback on what worked and what did not. Included in this release is the Atcore Test Client a simple GUI. This is easy to use and should work well for most people. This client only for testing Atcore and we will be releaseing Atelier as our offical client at a later time.

We have support for several firmwares, but not all firmwares. If your firmware is not autodetected try selecting the “repetier” plugin. If this happens to you please let us know what firmware you have and if repetier plugin worked for your machine. AtCore’s current feature set is mostly for 3D printers but printing to any G-Code machine that uses serial should work if you have gcode sliced for the machine.

Source Package atcore-0.90.2.tar.xz

Builds comming soon.


The enclosure post

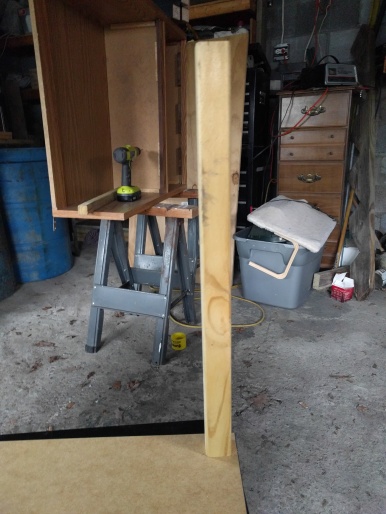
I would like a enclosure for my printer for a couple of reasons. I Print In ABS a lot and I would like to negate effects of the enviroment on my prints. I looked around a lot to see what others have done and many people use Ikea’s Lack table to create an enclosure. They are inexpensive and work well for making a box frame. I must have looked at 3 dozen different enclousers and one printer all made from these tables while looking around for what I wanted. The one that came closest to what I wanted to do was this one https://www.thingiverse.com/thing:1685857. I was planning to make real plans and a full tutorial for what I was about to make but one day my friend dave was over we decided to just build it we went to the local hardware place and got some MDF and a plastic panel for the door, some metal hinges and 90deg brackets. Unfortuantely my printer is too tall to fit inside with the tables just stacked on top of each other. I was going to print something to extend the tableleg but since I had found enough wood to make four legs I made legs at 19″. The legs were very carefully drilled out in center and the Ikea provided double screw could then be used to secure it to the table just like the lacks real legs.

IMG_20170513_150933.jpg
The first leg

Next the walls were mesured, cut and screwed onto the outside. I want to keep the build as modular as possible this way the panels can come off if needed.

803113309_52049
Painted and ready.

 Every thing was painted a flat black and after drying it was time to start assembling the enclosure.  I first put the lack table down and placed the printer on top of it and cut a small slot for the cabling to sit between the top table and the bottom one. Since the cabling was now recessed enough to place the top on I installed the 3d printer and secured the control box to the bottom of the lower table. Some of the final things like the hole for the filiment feed had to be done after the printer was installed so I could see where things lined up. Then a hole was drilled and a filiment guide installed and finally the top table attached to the bottom one.

It was then time to work on making a the door assembly.Cuttng the  plastic is difficult and I would recommend not only having the proper tool but also someone to help you keep it from moving as you score it.(thanks again dave)  Drilling thru the plastic very carefully we made holes for the hinges, door latch and handle in the plastic. Put it all together and its looks and works pretty good.IMG_20170526_183740

There are some things planned for the future on this such as getting my lighting properly wired into the control box for power instead of on a seperate power source. An Exhaust is needed still and there are currently no cameras in this enclosure. I need to re install my extruder cam as well as a PI  (w/camera) for enclosure control. For this I plan to make a fake walls on the sides and hide all the electronics and filters in that space . i will have a 1x24x24 space on each side to hide this all . This will help to keep the clean look it currently has with little change to the inside.

Moving from melzi to ramps

I have been very happy with my printer except for one thing my printer uses a melzi board. The only issue is there is only one firmware for melzi. This makes testing firmwares in AtCore more difficult since I can’t test on a real machine. In order to do that I need to move to a RAMPS kit. This will allow me to flash just about any firmware that I want. I will keep the details to a minimum for this post would be really long otherwise.

IMG_20170512_150149.jpg
RAMPS kit

After ordering the nessasary parts all the extra stuff I needed to complete this project I can finally begin. The first step is to build the ramps kit and then install some firmware with a sane configuration. For the first firmware I have decided to go with Repetier 0.92 since its the same as my old firmware.Using repetiers web configuration tool I ran thru all the steps only changing the required items. I was able to download and build this firmware and flash it in no time. The first test of the firmware and the screen didnt show anything. Checking the config I can see that I picked the wrong screen. With that fixed I could discover my next problem the control knob moved backward from what I was used to, it was to fast and had to high a repeat rate . So after a few more configs attempts I was able to get everything worked out and my board was now loaded with firmware.

IMG_20170518_174733
Mid board swap

Time to take the old control box apart and wire up the new one.. There is only one problem the plugs dont all fit on the new. Every wire needs new connectors. I made all my crimps, wireed the new board and fired up the machine. But there were problems. Y moved in the wrong direction and the Z motors were spinnng wrong. It didn’t take long before I had these issues fixed. With the motors all checked and working I was ready to try the heaters. That was when the fun really started, almost instantly you could see smoke and the mosfet for the bed was burning up. This killed that ramps board so i had to order another.

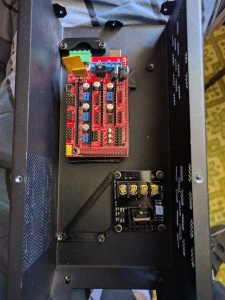
After a few days of waiting I receved my new ramps board and an external mosfet for the heated bed. With those installed every thing was ready to be put into the old case. I had to made a ramps holder that didn’t push the reset button . I did this by printing a few ramps holders and chopping them up and glueing them back together in way that worked in my case.

IMG_20170520_144837
Boards mounted in the old case

After that hack job was assembled I still needed to mount the mosfet board. Luckly I was able to find another mount and modify it to mount on the two unused melzi mouning posts.I also needed a way to get some space inside the case and a place to put my usb B external plug so we can plugin the ramps nicely from outside the case. I modified a 120mm fan adaptor to include space for my usb port and put the whole thing together to test. Its been working fine for about two weeks now and its printed about half of its new homes parts.